The DDC is where shaders for Unreal Engine projects are compiled and stored. You may have noticed when opening a new project on a standalone workstation or on a Disguise render node that shaders need to compile for quite some time, even if the project is very simple.
One of the benefits of working with identical, standardized hardware like the Disguise rx range of render nodes is that the DDC can be compiled on one machine and then shared across a network to other nodes in the RenderStream cluster, eliminating the need to individually compile shaders on each render node.
-
Create a DDC folder and share it to the network
-
Mount the DDC folder as a drive from each render node
-
Change local and shared DDC paths on the Windows level in Windows Environment Variables
-
In the Unreal Engine project settings (UE Editor), configure all render nodes to look for the shared DDC folder.
Please note: It is helpful to have some knowledge of Windows 10 networking in order to achieve this.
For our example, we will be using the following configuration:
-
vx 2 Director (vx-101)
-
vx 2 Actor (vx-102)
-
rx II (rx-204)
-
rx II (rx-205)
-
rx II (rx-206)
Please note: Your network configuration will vary depending on your system.
-
Create a DDC folder.
You can create the DDC folder wherever you want, but in our example, we will be using the D drive of our vx 2 Director (vx-101). We have chosen the D drive because this drive will not be affected by the server reimaging process, and we want to keep our storage on the render nodes open for RenderStream project files.
-
Share this folder to the network by right clicking it and selecting Properties > Sharing > Share.
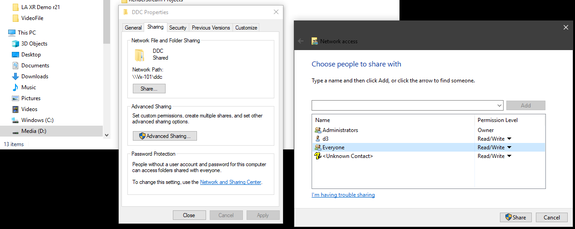
Please note: Inside the Share menu, your options may vary. For our example, we are sharing to “Everyone”. However, the IT infrastructure in your facility may affect this. If you try various sharing options and still are not able to see your DDC folder on other machines, you may need to consult with your IT Department.
-
Select your share group and make sure the Permissions say Read / Write, then click the Share button. Your DDC folder should now be shared to the network.
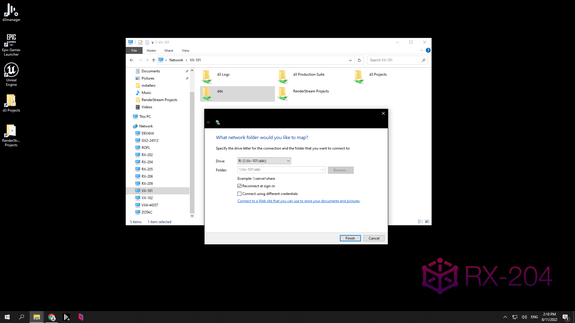
The next step is to mount the DDC folder as a drive from each render node. For a Shared DDC, it is necessary to mount the folder as a drive with a letter assignment from each render node. We will start with our first render node, rx-204.
-
From the first rx machine, open the File Explorer and scroll down to the Network tab on the side bar. The vx-101 machine will be visible from here. If not, it may be necessary to search for it in the top bar by manually typing:
\\machinename\nameofddcfolder
In this example, that looks like:
\\vx-101\ddc
Please note: If the DDC folder cannot be found, or if it can be found but not accessed, go back to Step 1 and try sharing the DDC folder with different permissions. You cannot proceed to the next steps without being able to access this folder from your render nodes.
-
Right-click on the DDC folder and select Map network drive. From the “Drive” list, select any available letter. For our example, we will select R: for RenderStream.

Following these steps, the DDC folder should now be mapped as drive R: to rx-201. Repeat these steps for all other render nodes.
Please note: For organizational purposes, we recommend mapping each render node to the same drive letter.
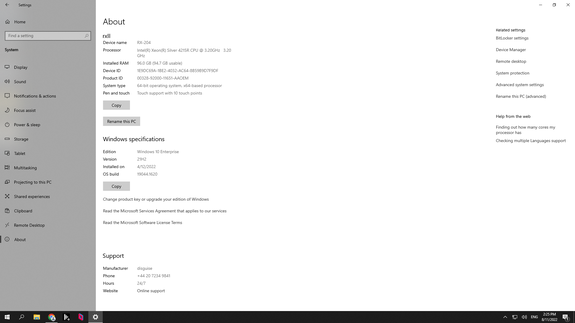
The next step is to change DDC paths on the Windows level in Environment Variables from each render node. Follow these steps:
-
From your first rx machine, click on the Windows key in the bottom left corner of the screen. Select System > About and navigate to Advanced system settings. A pop-up window titled System Properties will appear. Click on Environment Variables.
-
In the Variable name line, enter UE-SharedDataCachePath
-
In the Variable value line, enter the location of the shared DDC folder. You can do this by manually typing it in or using the Browse Directory or Browse File buttons to navigate to correct place on the network.
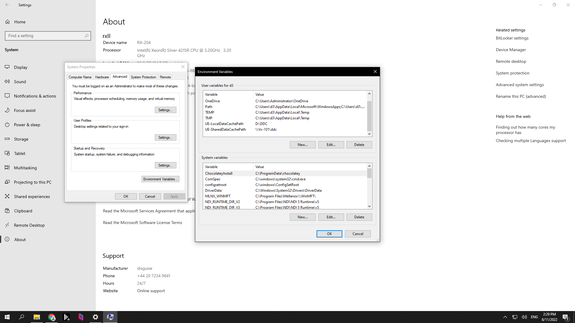
If you would like to change where local DDC is stored, you may do that here as well. For example, if Unreal Engine is installed to your C drive, but you are running out of space for cache there, you can change the local cache storage to the D drive:
In the Variable name line, enter UE-LocalDataCachePath
In the Variable value line, enter D:\DDC
-
Repeat these steps for all other render nodes.
The next step is to configure all render nodes to look for the shared DDC folder from inside the Unreal Engine Editor Preferences.
-
Open any project in Unreal Engine. Navigate to the top menu bar and select Edit > Editor Preferences. Use the left menu bar to navigate to General > Global and expand the Derived Data Cache section.

-
Under Global Shared DDC Path, type R: (or a different drive letter if you mapped your DDC folder differently), then press Enterto accept the changes. Unreal will prompt that a restart is required to apply new settings. Select Restart Now.
-
Repeat on each render node. Editor Preferences are not able to sync across nodes using third-party sync software.
Open a Command Prompt, enter the following, replacing the version number if different, and updating with your project details:
cd (UE Install Location)\Epic Games\UE_5.0\Engine\Binaries\Win64\
UnrealEditor.exe “ProjectFolderLocation/Project.uproject” -run=DerivedDataCache -fill
You can click and drag the project file into the Command Prompt window instead of typing the ProjectFolderLocation.
On the render node of your choice, open the Unreal Engine project you would like to launch. Confirm that all shaders compile completely, then Save and close.
From the RenderStream Layer in Disguise software, launch the same project file. If the DDC folder has been shared and configured correctly, then shaders should not need to compile on the other render nodes. Your project should start and launch.
To learn more about using Derived Data Cache, read Epic’s official documentation here.