Unreal Engine(UE) is a third-party game engine that can be used to create 3D scenes. Unreal Engine projects can be adapted such that they create RenderStream output streams using disguise’s UE plugin. This plugin contains several components that enable both camera based mappings with tracking as well as non-camera based (2D) mappings (e.g. direct).
Plugins
In order to communicate with disguise, Unreal Engine requires the installation of a plugin on the render node.
The RenderStream pre-packaged plugins for Unreal Engine are available in the disguise github.
For the most up to date plugin, you can compile the plugin from source code here
Place the plugin in this UE location on the render node: PROJECT_ROOT/Plugins/RenderStream-UE.
When adding a plugin to a UE/project, it is important that it is placed in the correct location and that the folder containing the plugin files is named correctly otherwise you may encounter unexpected errors.
Please note: Ensure the correct version of Disguise software is installed on all machines in network, including render nodes.
Setup Unreal Engine Project
-
Launch Unreal Engine.
-
Create a new Games > Blank project with default settings and ensure it is saved in: C:\Users\USERNAME\Documents\RenderStream Projects or D:\RenderStream Projects if using rx hardware.

-
Create a new folder called Plugins in the project directory.

-
Place the plugin in the Plugins folder.
-
Return to the Unreal Editor and click Restart Now.
-
Search for Cine Camera Actor in the Place Actors panel, or use Addand drag a new Camera into the scene.
-
Select the camera in the Outliner window and from the Details panel click the Add Component button. Search for and select the from the RenderStream Channel Definition.
-
The name of the Channel in Disguise software will be the name of the camera actor, so name the camera accordingly.
-
The setting Default Visibility defines whether the camera will see most actors in the scene.
-
-
Optional settings:
-
Click the ‘Show Advanced’ dropdown arrow underneath Default Visibility and set the advanced render flags accord to your needs.
-
[Optional] Force the visibility of select Actors within the Camera’s Channel Definition (useful for splitting content between the front and backplates):
To change the visibility of a component, add your selected Actor/s to the visibility sets by clicking the '+' button on the set and then selecting the Actor/s from the dropdown of the newly added element.
-
If you wish to add multiple Actors to a visibility set at the same time, lock the current selection into the Details panel, select the Actors you wish to add either from within the scene or the Inspector panel, right-click the visibility set you wish to add the Actors to, and select “Add from Selection“.
-
To make Unreal Engine run at full speed when out of focus go to Edit → Editor Preferences and untick “Use Less CPU when in Background” (search "cpu").
-
-
Save the project.
-
Close Unreal Engine.
Useful Unreal Engine information
Unreal Engine has several methods for saving a project. When making changes to a project for use with RenderStream, it is best to close the project before attempting to start a workload. This will prompt you to save all changes to your project. If your Unreal Engine project is not saved correctly, you may experience unexpected behaviour.
Status Monitoring
A helpful feature of the RenderStream plugin is the ability to show the status of the plugin in a widget
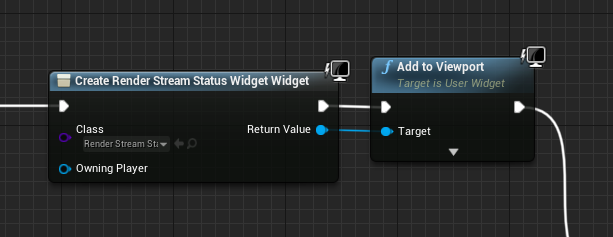
Here is how to setup the blueprint in the Unreal Engine project and add a status widget to the display:
-
Add a ‘Create Widget’ block
-
Change class to RenderStream Status Widget
-
Connect to an ‘Add to Viewport’ block by dragging off the return value of the status widget